The PX27 batteries contain silveroxyde or quicksilver and can cause environmental pollution. For this reason these batteries are no longer sold in certain countries.
MINOX has developed an adapter for the use of the new lithium batteries (type LR 44 or CR 1/3N). These batteries are sold in most countries and can be acquired at nearly every photo shop. The MINOX adapter for MINOX 35 mm cameras has the code number 69106 (for example EL/GT/PL) and for the 8 x 11 mm cameras the code number is 69108. The adapter can be acquired at your MINOX dealer or at any MINOX laboratory.
PX27 silver batteries for the electronic Minoxes (C, EC, LX, etc.) are available from some sources (see SWS Security). Mercury batteries works the best, but silver is a very acceptable second choice as mercury batteries are no longer in production. Other batteries may drop their voltage as they age, screwing up the functioning of the light meters and electronic shutters. Silver batteries are designed to hold their voltage constant all through their lives until they are dead, where with most other types of batteries, their voltage starts dropping as soon as you start using them. Purchase them for $15 each or $12 each for two or more. Price includes U.S. postage.
If possible, avoid the use of substitutes like the stacks of individual button cells. Battery type EPX27 from Eveready or V27PX from Varda also are good ones to use if you can find them.
PX28 (original Mercury) substitute batteries are sold as PX28A (A544), an alkaline 6V or V28PXL 6V lithium or Silver oxide 544 4SR44 6.2V.
15 VOLT BATTERIES FOR BULB FLASHES are rare and are imported especially from China. Eveready No. 504 (NEDA 220). If you want to use your bulb flash with your Minox, or have a complete collection, you need this battery. Price $15 each or $12 each for two or more.
Always remove batteries when not in use. Although silver oxide batteries do not leak in the way that mercury batteries did there can still be problems.
Martin Doctor produces stainless steel replacement shutter blades for $25. They now incorporate the etched circle which is the "cocked shutter" indicator of the original factory Minox blades. This means that customers must specify the particular model of the camera the blades are to be used in. Marty's replacement blades are strongly recommended. They are notably easier to handle than the original due to their slightly greater thickness.
Notes for installation in a Minox AIII (applies to Minox B as well) can be found at http://rick_oleson.tripod.com/index-32.html and for a Minox C (including an X-ray of one) at http://www.pearlglode.co.uk/huw/minox_c.htm.
Post war Minox submini cameras use a two-blade
IN-FRONT-OF-LENS shutter. It is not focal plane shutter. Though it has two
blades, during exposure, one blade is stationary, only one blade is travelling
at high speed across the lens, its square opening passing the lens thus expose
the film.
Heckmann's book has several diagram illustrating the various position of the
shutter opening in relation to the lens opening.
Looking from in front of the lens, the opening and closing of the shutter expose
the lens in the following sequence
1) BEGIN: Lens fully covered
<------- direction of shutter travel
|----
lens ( ) | | square hole on moving blade
|---|
2) Lens begin to expose
|----
( |) |
|---|
<------- direction of shutter travel
3) Lens fully open
|----
|( )|
|---|
<------- direction of shutter travel
4) Lens partially closed
|----
| (|)
|---|
<------- direction of shutter travel
5) Lens fully closed
|----
| |( )
|---|
<------- direction of shutter travel
Base on its principle of
operation we have the following shutter timing diagram, The numbering
corresponds to the phases 1- 5.
/ ---------------------------------\
/
\
/
\
-------/-------------------------------------------------------->
(1) (2)
(3)
(4) (5)
time axis
A mechanical retarding device control the timing of
phase (3) for lens fully opening, at slow shutter speed, this interval is
longer, and for high shutter speed, this phase is short
The following diagram illustrates the timing from slow shutter speed to high
shutter speed
SLOW SHUTTER SPEED
/
---------------------------------\
/
\
/
\
-------/--------------------------------------------------------
SHUTTER AT MEDIUM SPEED
SETTING
/
--------\
/
\
/
\
-------/--------------------------------------
SHUTTER AT HIGH SPEED SETTING
__
/
\
/
\
/
\
-------/------------------------
In fact the timing diagram of Minox shutter is identical to that of to COMPUR or
Pronto type leave shutter A shutter of this type in principle is capable to
flash sync at maximum shutter speed.
To achieve highest flash sync speed, it requires to trigger the electronic flash
exactly at point T, which is very short.
T
__
/
\
/
\
/
\
-------/------------------------
This requires exact timing.
Obviously, Minox designer chose to adopt a more relax timing scheme, put the x
sync trigger point some where further down
XSYNC AT MEDIUM SPEED SETTING
|
/ -----|--------\
/
| \
/
|
\
-------/----------------|----------------------
X SYNC trigger
In this way, if the X sync is slightly earlier or latter due to normal
production variations, the flash will still occurs during a fully opened lens.
In experiment with flash sync at higher speed, the flash sync point occurs
probably at phase (4), when the lens is partially closed.--- this explains the
light fall off
|
/ - \|
/
| \
/
| \
-------/---------------------\-----------------
(4)
X SYNC trigger
The Minox shutter is made of two thin (0.03 g each ) shutter blades, each with a square hole. Two characteristic of Minox shutter which distinguishes it from ALL other shutters( focal plane, Compur, Pronto, etc ) are:-
- The Minox shutter is in front of the lens.
- The two Minox blades never travel at the same time
This version, though base on Heckmann's
schematic, is a side view which shows more clearly how the blades open or shut
the lens , and also documenting when the shutter button is deactivated when it
is activated etc.
Minox A/B Shutter Action Diagram (Rev 2 )
Minox A/B shutter consists of two blades one at front (B1) one at back (B2). B2
has an opening at the right hand side, a circle 'o' mark at left ( view from
front of camera )
LENS
( )
opening
_____________________________________ rivet hook
|
________ -----------)
B2 |
o (
) |
____________|
(_______) |
|_______________________________________|
spring hook
Shutter blade 1 has an opening at left side.
spring hook opening
________________________________________
|____________ ____
|
| |
|
|
| |____|
|___________ rivet hook
B1
|______________________________________)
[ ] lens window
The opening on B2 is slightly larger then
the opening of B1 ( perhaps for tolerance reason ).
When the camera is opened, B1 is overlaid in front of B2.
From the lens window one can see through the opening of B1 and see the circle
'o' of B2.
At this moment, B2 shuts the lens.
Schematically, a shutter blade can be represented by
[||o|| ]
|||| indicates steel, the empty space represents opening on the blade.
And the Minox shutter can be represented by the following diagram,
( ) lens
spring
xxxxxxxxxxxx[||o|| ||] B2
xxxxxxxxxxxx[| ||||||||] B1
[
] lens window
That is what you normally see, when you pull open the Minox You see the circle
'o' on the second blade thought the opening of first blade
If you use a magnifying glass, you may be able to see the edge of the opening of
first blade.
The following schematics depict the shutter operating sequence.
1) CAMERA CLOSED
Shutter springs in tensioned state
Shutter release disabled
( ) lens shut
spring
xxxxxxxxxxxx[||o|| ||] B2 shut
xxxxxxxxxxxx[| ||||||||] B1 open
[ ]
lens window show circle o
2) Open Minox
Unlock shutter release
( ) lens
spring
xxxxxxxxxxxx[||o|| ||] B2
xxxxxxxxxxxx[| ||||||||] B1
[
] lens window
Careful! Partially open Minox even 3-4 mm will unlock shutter, if pressing
shutter button, the shutter will go off prematurely !
3) Press button -->Shutter released
Blade B2 spring released, B2 moves left to open lens
Lens fully open, as B1 already open.
( ) lens FULL OPEN
spring
xxxxxxx[||o|| ||] B2 open
xxxxxxxxxxxx[| ||||||||] B1 open
[ ]
lens window
Xsync trigger.
Film exposed.
4) DELAY UNTIL TIME UP
The delay mechanism start count down, according to set time from the speed dial.
( 1/2 to 1/1000)
( ) lens FULL OPEN
spring
xxxxxxx[||o|| ||] B2 open
xxxxxxxxxxxx[| ||||||||] B1 open
[ ]
lens window
5) Shutter closed
Time up
Release blade B1 spring, B1 moves sideway to cover lens
B2 remain open to lens.
( ) lens SHUT
spring
xxxxxxx[||o|| ||] B2 open
xxxxxxx[| ||||||||] B1 shut
[ ] lens window
see blade 2
6) CLOSE CAMERA
* Push blade B1 and B2 back to original position
* Shutter spring tensioned ( zzzzzzzzzzzzzzzzzzz )
* Shutter button deactivated.
( ) lens shut
spring
xxxxxxxxxxxx[||o|| ||] B2 shut
xxxxxxxxxxxx[| ||||||||] B1 open
[ ]
lens window show circle o
Martin Tai
The white or wheat bulb on the early Minox C uses a lot of current. Test low light condition sparingly. When it lights up with a steady colour the exposure needed is longer than 1/30 second and a tripod should be used or attach a flash unit.
Note that the light can be used to find a keyhole in the dark if you don't mind replacing PX27 batteries very frequently! Peter Zimmerman Submini-L April 1997
Ian Ross, UK, Nov-Dec 1996. When I used to do colour processing, I never felt confident about using a Minox daylight tank (the bakelite black one) having regard to the high temperature and exactness required. Instead I used only the helical part of the tank - with the film stuck to it with tape - and transferred it from one container to another, each containing the appropriate solution and all three containers lodged in a thermostatically controlled water bath. Times were controlled by a Durst Coltim timer. The container in question was taken from a nest of measurers produced by Unicolor, the highest being 600 cc and the smallest, 15 cc. The actual one chosen was that containing 130 cc. it could have been tailor made for the purpose and holds the spiral or helical together with the solution to perfection. The water bath was the Paterson revolving drum print processor. This is a rectangular plastic basin filled up with water, with the drum suspended over the centre and bottles and containers clipped to the sides. A small black tubular water heater connected to a thermostat was stuck to the bottom. I am sorry if all this sounds involved but it was actually quite simple; the only trouble I ever got into was using the Coltim's luminous dial to peer at the film and getting it fogged in the process. It should be possible to improvise an alternative to the Paterson setup.
If one repeatedly takes 5 cc from a 250 cc bottle, eventually oxidisation will occur and a lot will have to be thrown out and wasted. I have a supply of 50 cc brown glass bottles fitted with plastic "medicaps" which are air proof. When necessary, one of these is decanted into 5 similar bottles of 10 cc. To develop, 4 to 6 cc are extracted and the rest thrown away. The storage of stop and fixing baths is less critical.
Peter Zimmerman Dec 1996. I have done 35mm film in my JOBO processor
with no problems; once I got time and temperature adjusted. I have never dared
put Minox film in the tank because I like to use dilute developers and little
agitation. This builds up 'edge sharpness' (or acutance) at the boundary between
areas of very different density. What happens is that the developer exhausts
itself over the highly exposed area, but right at the boundary some developer
which is 'over' the low density region flows over the boundary and 'super
develops' the high-density area in a narrow (REALLY narrow) 'line'. In some
photochemical manuals you'll find this called the 'adjacency effect'. Because
it's good in any photo work, and particularly in submin work(!), subminiature
B&W film really suffers from continuous agitation. Modern colour negatives don't
suffer because they were designed to work that way.
In my experience. 'grainy' and 'flat' have been the hallmarks of Microdol 1:3
(as used by MPL in the 1990s). It's why I don't use it. But I always have to add
that others have used it with brilliant results. It just doesn't work for me.
That's part of the
fun in photography.
Editor: The 8x11 Jobo reel from www.8x11film.com over comes these issues and adopts a rotating and swirling action that with the small amount of movement of the film in the guides produces consistent results.
When filling hold the tank at an angle. Besides tapping it hard on the
table, to remove bubbles, swirl it in a similar manner to swirling brandy in a
glass. Repeat this during developing.
The Minox thermometer is used to pump the solution. Fill to the top and catch
the overflow and refill. This also helps keep the developer mixed.
Michael Goldfarb Dec 1996. When handling, I always keep the index
finger over the top portion of the tank so it doesn't open accidentally or use a
strong rubber band. The Riga tanks have a metal retaining clip and the heavy
GaMi tank, of a similar design, has a beer bottle type locking of the lid.
It can be tricky to clip the film to the spiral. The last negative is often lost
to fogging and with processing laboratories this last frame frequently has a
label over it and so only partly developed.
In older, 50-exposure tanks the best way to determine that a roll is properly
loaded
is by getting resistance at the end, when the column is 2/3rds of the way down.
(For a while The 36-exposure filler ring has been known to get stuck at the
bottom of the tank. The difference in the solution amounts are trivial, and even
though you can "feel" when the film is un-spooling onto the column, you get the
secure feeling of getting that resistance at the end.
For washing remove the spiral from the tank.
Originally Walter Zapp wanted a 100 length roll for his Minox but settled for 50 exposure lengths. The first cassettes where made of metal. This was changed to plastic in 1960s to reduce production costs. The US market, Kodak, had established 36 exposure as the standard length and offered week-end loads. Minox followed suit and offered 15 exposure length in 1966 and then, with the Minox C 36 and 15 exposure lengths and the 50 exposure film was discontinued.
The 15 exposure film has a take up spool that is thicker than of the 30 and 36 exposure film giving an outside diameter of 11mm instead of 10mm. The film is attached to the take up spool by tape. To anchor the tape the film has two holes (15mm from the end) punched into it and the tape is fastened both sides over these holes. Near to this is a semi-circle cut out from the edge to mark the beginning of the film. At the end of the strip 20mm in a key slot is cut out of the film. Besides marking the end of the film this is used to hang the film for drying. The film is also coded with a pattern of dots to indicate the film type.
The table below has been taken from measurements of uncut film. Modern film is thicker, hence the 30 exposure length of Minocolor Pro film and you may find that you get less length in than Minocolor or Agfa pan films.
| Exposures | Take-Up spool diameter | Metric | Imperial |
| 15 | 11mm | 31.5 - 32 cm | 12.9" |
| 30 | 10mm | 52 cm | 20.3" |
| 36 | 10mm | 57.7 - 59 cm | 23.2" |
| 50 | 10mm (metal) | 77 cm | 30.1" |
Note: EC and ECX cameras are top mounted cartridges; that is the film is upside down to the the metal Minox cameras.
| Camera | Coding |
| Minox III-s | no edge code |
| Minox B | no edge code |
| Atoron | no edge code |
| Atoron Electro | left side, bottom, wedge |
| Acmel MD | left side, centre, triangle |
| Minox C | right side, bottom, semicircle |
| Minox BL | right side, top, semicircle |
| Minox EC, ECX | top edge, right side, semicircle |
| Minox LX, TLX | right side, centre, semicircle |
| Minox LX 2000 | no edge code (?) |
| Minox MX | |
| Minox Leica IIIf, Classic Collection | right side, centre, triangle |
| Fuji 007 | |
| Minox/Sharan Classic cameras | no edge code |
Minox mark the film to indicate that the film is new - not used - with a semicircular cut that sits between the feed and take up sides of the cassette. When the film is wound through the end has a key hole which can be used to be clipping in place in the Minox daylight developing tank as the spiral unwinds the film. Also at the end of the film are small holes that indicate the type of film. Minox also mark the cassettes with the film type and length.
When loading film yourself a similar discipline is useful. The difference between 15 and 36 exposure is in the thickness of the take up spool, which can not be seen when film is loaded into the cassette. Small self adhesive labels can be stuck to the top of the cartridge with all the information needed. If this is too small to write on then use a code e.g. red dot for colour film, black for black and white. If the label is too thick the camera made not close and open again easily and should be removed and put onto the back of the camera. Dots of paint or tipex could be used to the same affect, but make a note of what key you are using.
The cassette case can also have a white label which can be marked up if you need to change film mid-load and put into the camera at a later date to finish.
A small handheld punch can be used to make a key hole in the end of the film. This need not be done until the film has wound through, so you then do not need to struggle in the dark to make the keyhole. Punch the edge of the film, like Minox, to indicate the film is ready to use from the first frame. Some film stock, e.g. Agfa Copex is very tough and you need sharp blades to make a clean cut.
If you are re-using the old style plastic cassettes or the early metal ones the cap can be stuck down with audio tape, used for joining reel to reel tapes, being slightly wider than that used for compact audio cassettes. Slide masking tape, 0.25" wide, opaque black and very thin, is also perfect for this and to fix the film to the take up spool. "White Artist's Tape" is bright white - acid free, flat surface, accepts ink and pencil, removes cleanly, comes in various widths and either cuts or tears. 60 yards cost about 2.50USD.
The modern Minox cassettes have caps that clip into place. The clips are weak and easily broken. These are better than the cassettes that need taping down. The felt light traps should be blown before use - use a blower, not your breath.
Note that MicroTec had trouble with the cassettes not being opaque to IR, so it may be a very hard job to shoot IR in a Minox. Metal cassettes if in good condition should be better.
Splitting film and loading cassettes is a critical issue, with camera jamming and film scratches a serious threat if you don't do it just right, so take time to learn the format and the cameras thoroughly before expending too much effort in this direction. Factory film loads are much more reliable and convenient than home loads. Godfrey DiGiorgi November 1996
Before slitting your own film test out the camera with factory loaded film and lab processed developing and printing. Once you are confident about the results develop factory loaded film yourself. Before slitting your own film from 35mm stock use a couple of spare cassettes to load shorter length films. This allows you to get used to loading the tiny negative strips before finally slitting the film. If you are film types that are new to you as well as slitting and loading the film for the first time you are never sure where any fault may lay or where you may need to improve the technique. Loading your own film and processing yourself will save money, but don't expect to do it perfectly the fist time from scratch.
The Minox tank holds 53cc of developer and concentrations are high. If you want to experiment with lower concentrations you need one of the Honeywell Nikor stainless steel reels or a Jobo 8x11 reel. Using a standard developing tank has the advantage of being able to follow more closely the recommended processing given by the manufacturer but some experimentation may still be necessary.
www.8x11film.com has published techniques and advise on using the Minox tank and the Jobo 8x11 reel. The spacing on the Jobo 8x11 reel allows for some movement of the film strip which, with rotation and swirling (like a brandy glass) gives consistent results and with films that have proved very much harder to developing using the Minox bakelite tank at room temperature.
Ian Ross wrote in December 1996 "Years ago I bought up as many as I could find of Russian manufactured "Film Splitting Trimmers". These are black circular devices measuring about one inch across and one inch high with a passage through the centre (about 3 mm wide) through which one pulls 16 mm film to divide it into two strips, each 8 mm wide. The actual cutting blades are in the form of wheels. The film pulls through like magic - it positively glides. On opening one up out of curiosity, I found it contained ball bearings. If these things are still anywhere to be found - perhaps in some old 16 mm movie store - they should be bought! They cost me peanuts. They are the basis of a real ace cutter if only one can find an suitably equipped engineer to adapt them. I was lucky enough to be acquainted with the Principal of a Technical College. As a result I have a cutter for obtaining 9.2 film from single perforated 16 mm film, another one for getting 16 mm from 35 mm, another for an 18.4 strip from 35 mm and, finally, one for dividing the 18.4 strip into two 9.2 strips. As a result, with a plentiful supply of Minox and Minolta 16 cassettes, I have not bought subminiature film for years. Cutting in complete darkness is no bother. I have never had dust or scratches. It is not difficult to roll 36 exp. lengths of Minox film into the magazine side of the cassette. Attaching the end to the take up spool is a little more fiddly but I follow the instructions given by Rolf Kasemeier - although he disapproves of the practice. The sticky tape used is roughly the same breadth and thickness of music cassette tape. Mishaps have included failure to transport 50 exposure film (probably too thick) and lids coming off the cassette when it is pulled out of the camera at the end of exposing - probably through the use of old and dried out sticky tape. But by and large everything has been trouble free."
Peter Zimmerman
December 1996. Minox film
scratches come from 3 places: dust on either side of the film which catches
in the cassette lip and marks the whole film; a problem in loading the film or
slitting it, particularly if you spool the film too tightly so that one layer
presses tightly against another; and marks from handling in developing. One way
to protect yourself is to use a hardening fixer and either an alcohol-based film
drying agent or a wetting solution.
This may sound crazy, but the very best squeegee I know, and the one which never
scratches, is the skin between my index finger and middle finger, washed
carefully just before using and then dried very well with a lint-free cloth or
soft paper towel! If you dry it carefully, your skin will NOT transfer any oil
or gum to the film. I have never had as good luck with a rubber squeegee or a
sponge, in part because they are very difficult to clean and to get totally dry.
Also, one must NOT dry Minox film with a hair dryer because it always catches
dust in the grids and then blasts it free into the film. Patience.
Michael Goldfarb December 1996 I don't squeegee my
Minox film! I just give it a quick soak in a very diluted Kodak PhotoFlo
solution and hang it right up. (I'm talking a capful of PhotoFlo into a small
tray of, I dunno, maybe 24 oz of fresh cold water. It only needs to sit in it
for a half-minute or so.) My Dad always uses this solution when hanging 4x5 b/w
film to dry. (Odd-sized litho film too.)
Convenient how the cassette acts as a weight to pull the film straight, no?
I guess you CAN squeegee 9.5 film without scratching it, but I never wanted to
find out. Mind you, I have loads of problems with ambient dust after the film
drys: my Dad's darkroom is filthy by current standards, and his 50-year-old
enlarger hasn't been vacuumed out in I don't know how long. But the only
"telegraph line" scratches I get are from "pulling" adjustments once the film is
in the negative carrier - I try to avoid these, but it's difficult.
I always try to print as much as possible the first time out, because I find the
Minox negatives scratch really easily. Even though I cut a roll into three
strips and put them into a 35mm negatives preserver as soon as they dry, I find
just looking at them on a light box and adjusting them in the carrier while
printing a few on the same strip causes incidental scratches.
Regarding the dust question, blowing it off with an air can doesn't work, but
wiping it off with a lint-free cloth does. That is, it moves the individual dust
specs around and hopefully off the most significant parts of the picture. (Of
course, taking the negatives out of the carrier to wipe them and putting them
back generates more scratches and dust!)
It's been said before: Minox film requires REALLY careful handling. But it's
worth it - the results are occasionally quite remarkable... even from humble APX
100 in a dirty darkroom!
Don Krehbiel Dec 1996. The edge of a dry-mount
tacking iron and a piece of wood could be used to melt a new seam between each
existing seam in 35mm negative pages, thus making perfect Minox pages. I think
high heat was used but some experimentation will be necessary. There seemed to
be
an exact temperature which fused the plastic without melting it too much.
I would certainly NOT store negatives rolled! Is that what you are talking
about? I have just finished un-curling negatives from the '30s which were stored
in cans. UGH! It takes about a year rolled backwards before you can get them
into a sleeve.
Joel Moskowitz Dec 1996. Not to unroll them load them onto a 35mm reel
and soak in water 80 degrees F or so. Fotoflood them and hand up to dry. Then
cut up and put in sleeves properly
Editor: APS films are stored in their original film cartridge. This
protects the negatives and a hands-off approach with film scanners reduces the
chances of dust and scratches.
Peter Zimmerman Dec 1996. One thing you can't do with the Minox wallet is
to make contact sheets. MicroTec's discontinued wallets were very thin and
worked very well.
Godfrey DiGiorgi, Don Krehbiel December 1996. Be sure to unlock the pressure plate properly. You will notice that if you open the camera ALL THE WAY the pressure plate closes. You must then slightly close the camera and you will notice the film gate open. Watch the film gate as you slightly push-and-pull the camera. Then jiggle the cassette with your thumbnail and pull it gently straight up. It tends to twist slightly backwards which allows the cassette to foul the camera casing just slightly and also causes the film canisters to scrape in the camera body. The LX has a little more clearance for the cassette and a spring load mechanism to push the cassette up.
Martin Tai Submini-L December 1996 Minox A/B/C etc cassette
is by no means easy to retrieve from the camera. I have tried finger nails (
index, small, thumb ), screw driver, Swiss Army knife, Sorlingen tweezer ...
None work too well.
Now I have a MOST effective Minox retriever, with it everyone can take out a
Minox cassette in seconds.
Cut piece of calling card strip about 5mm by 5 cm long bend one end slightly
\______________________
Insert the bent end into the |) shape slot, push lightly end A shall come
out from other end, and the cassette will pop out easily, take hold of both end
of the calling card strip, lift the cassette.
... and I thought every Minox owner used his thumb nail, unless they chew their nails and then they use the second most useful pocket accessory - a Swiss Army knife. :) Gerald McMullon Submini-L April 1997
Michael Goldfarb, December 1996. I have my
III-s in a black nylon belt case meant for Swiss Army (and slightly larger)
pocket knives. I like it better than the old Minox belt cases - besides not
having one! - in that the camera hangs vertically rather than horizontally. It
uses less real estate along my bulging waistline!
It's meant for knives up to 5", so the closed III-s - which I put in head down -
goes all the way into the pocket portion. The flap portion (which can
extend a bit) I close as far down as the Velcro closure will go. This leaves
about a 3/4" gap above the edge of the camera, but it's not really open
because the camera is all the way in the pocket.
This case cost me about $6 in a sporting goods store and is large enough for a B
or LX - a C would be a snug fit. I have also seen really nice black leather
knife cases with snap closures for a bit more money. The trick with them is to
have enough slack within the case so that the camera doesn't stick a bit and
open accidentally when you pull it out (a problem in pre-Minox Cs in that you
only want to open the camera when you really intend to take a picture, since it
always advances the film when closed), but doesn't have so much slack that it
rattles around. The almost-daily use for the last year-and-a-half has frayed the
top of the belt loop on my nylon case.
When I was using a chain, it came right out the top via the space between the
pocket and the fold of the flap, hung a la a zoot suit watch chain, and
connected to my pants belt loop a bit in front. (I wear my Minox on the right
side of my belt, slightly behind my arm-hanging-at-rest position.) The problem
there was that such a chain didn't really suit my lifestyle. After a couple of
months I broke it on the edge of a seat in a commuter train; had a jeweller weld
it; then subsequently broke it again on the seat-belt housing in my car. (The
chains are only nickel-plated copper, and are fairly brittle and break easily.)
I didn't bother trying to fix it that time.
I miss having the chain on hand for close focus. Someday I'd like to get another
to wear on "formal" occasions. I asked MPL, it was an absurd $37 (vs. just $18 a
few months earlier); now they don't have them listed.
Anyway, I'm very happy using the knife belt case, and recommend it.
PS [Ed] Chains are available for A/B or C/BL/LX cameras for 38.80EURO+VAT.
The Minox EC and ECX cases are suitable to use to protect a Minox A from dust and scratches. The Minox A is a little loose in the case so can not be hung from the neck in the same way with the case in place as with the EC. Replica cases for the Riga have been commissioned and sold in German and Italy.
The case from Luigi Crescenzi [webmaster@leicatime.com], 40-60USD (on auction) have a Riga logo and available in black or brown leather. As original narrow zips of the original Riga case are no longer available a heavier metal zip has been used. Unfortunately the small dimensions of the case mean that this is inflexible and could scratch a Minox A or EC camera. It is unlikely to be a problem with the stainless steel body of the Riga.
The German cases from Arndt Kizina for 42EURO are of a softer leather and use a small nylon zip. These are also very suitable for Minox A and EC cameras.
Having cleaned and resurrected dozens of Minox cases over the years, I would heartily warn against the use of Neatsfoot oil, or any oil for that matter. The problems with their use are many, but mainly:
1. Oil will accelerate the separation of the glue points in the case
2. The use of so-called "leather care" oils on old leather is that it acts as a suspension agent to conditioning and cleaning solutions like saddle soap, thus preventing them from naturally drying.
3. They are more of an exterior dressing than a restoring agent, like putting Armoral on the dashboard of your car.
My standard treatment for all Minox cases (and all old leather products in general) is a gentle cleaning of the exterior with tiny amounts of saddle soap applied via a Q-Tip in a constant swirling motion. Allow the case to sit for an hour or so before taking a clean, damp (warm water) cotton rag and gently wiping it. Let it dry for at least an hour then repeat the saddle soap conditioner again and after an hour buff it with a dry cloth. If there are deep scars in the leather and you want to renew the exterior luster, use good old-fashioned Kiwi shoe polish applied with a Q-Tip and allowed to dry for an hour or so. Then use a dry cloth to buff the surface.
It is worth mentioning that I take great strides to keep all applications clear of the interior of the case. To that end, I pack the case with Kleenex prior to applying anything to the leather so as to keep any solutions from ever finding their way onto the surface of the camera.
Bob Christopher, [rbc@ezlink.com]
Barge cement is the one usually recommended for gluing leather and seems to work well. Kevin Kalsbeek [krkk@EARTHLINK.NET ]
It's also worth pointing out that the 'body' of most Minox cases is simple cardboard. Any moisture getting under the leather 'skin' can be disastrous. Peter Zimmerman [peterz@EROLS.COM]
Minox cameras retained their second hand resale value for a number of years. With a proven history of long term reliability they are still sought after for use and for collections. In 1996 a Minox AIIIs could be obtained for $150-180 and a B for under $150. In 2004 a Minox IIIs could be purchased at online auctions for $100-120 and a Minox B for as little as $60.
| Winter 2000 | |||
| Description | USD | DEM | GBP |
| Film | |||
| Minox Agfapan 25,100 or 400ASA 36 film | 5.00 | ||
| Minox Minocolor 100SA/21DIN / 30 Pro Film (30 Exposures) | 9.99 | 7.50 | |
| Minox Minocolor 3 / 36 Film | 7.99 | 6.00 | |
| Minox Minocolor 400ASA/ 27DIN / 36 Film | 9.99 | 6.50 | |
| Minox Minocolor 100SA/21DIN / 30 Pro Film (15 Exposures) | 7.00 | ||
| Minox Minocolor 3 / 15 Film | 6.00 | ||
| Minox Minocolor 400ASA/ 27DIN / 15 Film | 6.50 | ||
| Acmel 21DIN 36 Film | 7.00 | ||
| Acmel 27DIN 30 film | 7.50 | ||
| Minochrome 50ASA 36 film with processing | 13.00 | ||
| Minochrome 50ASA 36 film with processing and mounting | 17.00 | ||
| Minox Processing Mailer 30 Exposures | 16.99 | ||
| Minox Processing Mailer 36 Exposures | 18.99 | ||
| Film wallet | 1.25 | ||
| Processing Paz and 8.11. Lab. | |||
| Handling charge | 2.00 | ||
| Developing 8x11 | 2.25 (2.95) | ||
| Developing, contact print and en-print | 3.28 (4.50) | ||
| 7x10 (3x4") en-print each colour | 0.45 (N/A) | ||
| 9x13 (3.5"x4") | 0.55 (0.50) | ||
| 10x15 (4x6") | N/A (0.70) | ||
| 20x30 (8x12") | N/A (7.00) | ||
| 13x18 (5x7") | 2.50 (N/A) | ||
| 20x25 (8x10") | 8.50 (N/A) | ||
| 9x13 en-print each black and white | 0.42 (N/A) | ||
| Cameras | |||
| Classic Camera Leica IIIf | 799.00 | 299.00 | |
| Minox LX 2000 | 2598.00 | 1069.00 | |
| Minox CLX (chrome) | 2498.00 | 1150.00 | |
| Minox TLX Subminature Camera | 950.99 | 1998.00 | 895.00 |
| Minox TLX Subminature Exclusiv-Set | 2089.00 | ||
| Minox TLX Subminature Camera Set (with electronic flash) | 995.99 | 2098.00 | 975.00 |
| Minox LX Gold I | 5999.00 | ||
| Minox ECX Subminiature Camera | 279.99 | 599.00 | 235.00 |
| Minox ECX Subminature Camera Set | 349.99 | 749.00 | 288.00 |
| Minox MX Subminature Camera Set | 319.99 | 399.00 | 219.00 |
| Minox MX Subminature Camera | 249.99 | 499.00 | 165.00 |
| Accessories | |||
| Classic Camera Blitz | 199.00 | ||
| ECX Blitz | 199.00 | ||
| 8x11 Blitz | 199.00 | ||
| Flash adapter for B/B:/C/LX cameras to use 8x11 electronic flash | 49.00 | ||
| Flash hot-shoe contact adapter | 59.00 | ||
| Case for AX Gold II | 119.00 | ||
| Case for LX Gold I | 119.00 | ||
| Chain for A or B | 69.00 | ||
| Chain (vergoldet) | 99.00 | ||
| Gewindeanschluss TLX, LX, AX | 29.00 | ||
| Tripod | 159.00 | ||
| Tripod head or Tripod adapter for LX | 39.00 | ||
| Copy stand (for A, B,, C, BL, LX) | 299.00 | ||
| Combi case for EC and 8x11 flash | 59.00 | ||
| Combi case for MX and MX flash | 59,00 | ||
| Grey filter for MX | 29.00 | ||
| EC case | 29.00 | ||
| ECX case | 39.00 | ||
| Daylight developing tank (15/36 exposure) | 199.00 | ||
| Thermometer | 29.00 | ||
| Film slitter 8x11 | 399.00 | ||
| 36 slide mounts | 29.00 | ||
| Magazine of 3x36 slides in plastic case | 39.00 | ||
| PowerPack 8x11 69108 - for Minox C, LX, EC, ECX | 39 | ||
| Battery for B/C flash Mallory M504 15v | |||
| Repairs | |||
| Light meter for Minox B - DAG | 135 | ||
This is perhaps the most critical issue in having truly sharp pictures with any camera, but especially with subminiatures. Using a tripod improves the sharpness of any camera I've ever used ... even though they are a pain to carry, slow you down a lot, etc, getting used to having one with you always, even if just a tabletop tripod, makes the biggest difference of any equipment pounding I've done. I have the Minox tripod which is an ultra elegant and very compact device, if a little bit slow operating and inflexible. Additionally, I have a very small and light table tripod purchased from REI made of polycarbonate. It includes a Velcro strap so you can attach it to the handlebar of a bicycle or motorcycle, or a branch or fence post too, and weighs only 4-5 ounces. Very handy. A subminiature with a secure tripod like this can be an awesome kit for bicycle and hiking. It's amazing the pictorial work you can produce if you're really serious. Godfrey DiGiorgi
Suggested alternatives to the Minox pocket tripod
The measuring chain ring (still available for Minox A/B or C/BL/LX cases from Minox) can be hooked though the rectangular link near the case and hence forms a neck chord. I have carried a pair of Minox Cs or a C and BL in this fashion on many trips including commuter cycling, normally hung out of view under my shirt. However, having seen the results of the clasp coming off a second hand chain it was possibly luck that I never had a chain break.

The EC neck chord is perfect for the EC camera and having the same clip as on the chains for the C, BL and LX cameras can be also be marked up with beads (sown on thread) at the appropriate length to act as a rough measuring chain.
The ECX uses a primitive spring locking washer for the 'bolt' to the camera body. This falls out very easily and more than one user has reported seeing their new ECX drop to the floor.
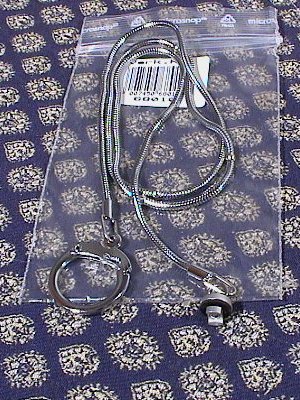
Using a chain, particularly with a small camera like the Minox A, AX and EC instils confidence that you will not drop it, or if knocked out of your hand will not fall far. If you hold a Minox Riga (which has no chain fitment) this becomes even more apparent. The stainless steel is more slippery, the camera surprisingly heavy and frequently they are hard to open- add that to the cost of one of these collector cameras it puts you on edge using one. The chain also is long enough to wrap around a belt several times so it the camera falls out of side pockets it will not travel far. Unfortunately there is no wrist chain, similar to that of the Minolta MG-s with which it can be secured in a belt case and to the belt.
Don Krehbiel, December 1996 "I found the wrist strap for my old Bolex 8mm movie camera. It has a tripod fitting so attaches directly to the LX and with the tripod attachment to the others. My favourite is the Minox AIII hanging on the wrist strap WITH a LONG cable release which I wrap around my hand. Properly held and with a steady squeeze on the cable, it is possible to get VERY sharp images at slow speeds. I discovered long ago that, even though a 15mm lens should be hand-holdable down to 1/15th second, camera movement is the single most frequent factor in MY poor Minox images. Squeezing BOTH sides of the camera (including the shutter release) also helps."
Many photographers are rightly concerned about the use of x-rays at airports and other detectors. As long as the use of x-rays to detect drugs and dangerous articles continues I advise against allowing sensitive film and electronic equipment to be passed through x-ray equipment.
I have had no problems with refusing to have my Minox film and cameras go through X-ray machines at airports in the UK, Germany, India, Iran, Hong Kong and China. At most I have had to open every sealed Minox film case to show that it was a film and not what ever they though you could fit in side a Minox film cartridge (at Heathrow) and at Hong Kong had to waste a frame in each Minox camera, charge up the flash (because I refuse to take out the batteries from the Minox ME2) and open every case of film to show the film inside it's cartridge. I had no such problems at Canton, Xian, Beijing, Baghdad, Bombay, Delhi, Frankfurt or Glasgow. I did not expect to and did not need to hand over any money for the cost of 'separate treatment' in any of these airports.
I have never knowingly taken EPROMs in baggage handing, but most of the electronic equipment has them. Because of cost I would always carry electronic equipment as hand luggage. Even in travelling to Glasgow from Stanstead we refused to have the floppy disks past through metal detectors or scanning equipment. Our whole trip was dependant upon the sets and copies we carried and no way could we risk having to fly back for another set (forget FTP and Email, that was still in it's early days and there was no techno at the other end to get the task completed).
My slide film from India, taken with an LX were poor - over exposed - centre flare. The negatives taken with a EC were perfect. Both film types were kept together so I have no idea why there is a difference, but I can't blame X-ray machines and I can't re-test the cameras as both were stolen on the trip. Gerald McMullon, 1997
When X-ray equipment was first installed they used more power than needed and so could have been the root cause of the concerns about film and cameras passed through X-ray machines. Improvements where made and for a period the machines were apparently 'safe'. It was then reported that to some locations the machines where no longer adequately maintained. Since the heighten fear of terrorism more checks are made and perhaps at higher powers level. Minimise risk.
Information about the flash synchronisation of the Minox cameras can be found in their respective handbooks and in user guides like the Focal Guides and Kasemeier's Small Minox, Big Pictures.
Minox AIIIs
Flash Source
Electronic Flash Units 1/2 second to 1/500 second
Flash Bulbs: SM, SF 1/2 second to 1/100 second
M-2, 5, 8, 25 1/2 second to 1/20 second
Minox B
For electronic flash, set the exposure dial to 1/200 sec. or slower, attach the flash cable to the flash post of your Minox.
For flash bulbs, set the exposure dial to 1/20 sec. or slower.
The Minox A handbook was produced before Minox had an electronic flash. Correct synchronisation faster than 1/100 on the A and B cameras is unlikely. The manuals for the ME2 and 8x11 electronic flash also hold similar information, accurate for the ME2 and 8x11 electronic flash..
The Minox AIII-s and B synchronise at 1/20 for flashbulbs and 1/100 for electronic flash.
The Minox C, BL and LX synchronise at 1/30 and 1/125, reflecting its different speeds.
The Minox C synchronises at 1/30th and all speeds up to 1/125th. The Minox LX is able to use the flash as fill in light in fully automatic mode.
On the EC there is a flash symbol next to a switch.
Michael Goldfarb December 1996 "I have shot electronic flash with my III-s (by holding the camera in the right hand and the flash in the left hand with an 8" PC cord between) and gotten very good results at 1/100. When first testing the camera, I also tried shooting electronic flash at 1/50 and 1/200; it worked pretty well, but there was some falloff on the sides (of a horizontal picture) reflecting the shutter-blade travel. Shooting at 1/200 would certainly produce acceptable results if you needed to freeze action that would blur at 1/100."
Gerald McMullon "In bench top tests of Minox C and LX/TLX cameras with the Minox ME2, Minox 8x11 electronic flash, Minox MX flash and the Acmel MDX flash unit it was found that all LX/TLX cameras would fire all flash units up to 1/2000th. Only some Minox Cs, notably the one most recently serviced would fire the flashes units above 1/250th. In particular the Minox MX (not designed to work with any camera other than the Minox MX) would only fire up to 1/125th - the synchronised speed for the MX.
The ME2 produces variable fill in light. Although a Minox C will fire it at 1/1000th the results show that it was not in synchronisation. 1/250th certainly can be.
Some users have found that the Minox MX flash will work consistently with there metal Minox camera, others have reported that the majority of the time it fails. The Acmel MDX flash has a light sensor. Some Minox MX electronic flash units also have this sensor, but as the camera has no light meter and no film speed setting it is debatable whether the sensor operates with the Minox MX camera.
If the flash is fired at all speeds up to 1/100th (1/2000th LX) does not mean that the film will be synchronised. Conversely if the flash fails to fire you know for certain that the flash has no effect on the film"
Godfrey DiGiorgi December 1996. Here's a useful
technique for using a flash with the Minox: Ok, so you load 100 speed film and
you find you need to use a flash. How do you regulate the output for varying
distances? Your little flash unit has no power control...
Simple: use tissue paper. I've calibrated my flash unit with a flash meter,
testing empirically with folds of tissue paper over the flash tube until I
created a chart which correlated distance with number of folds of tissue paper
to achieve a proper exposure at f/3.5. Typically, I find that on the rare
occasions when I want to use flash, most of the pictures I'm taking are at one
or two subject distances so it's easy to just rubber band a few folds of tissue
paper onto the flash unit for that distance.
Minox green and orange filters found on the Minox A (II,
III, IIIs) had filter factors of 2x (green) and 3x-4x (orange) depending on the
red sensitivity of the film.
At the end of the IIIs run the orange filter was replaced with a 10x ND filter,
like that of the Minox B.
The B had a 2x green and several different values of ND: 10x, 8x, and near the end of the run, 4x. You can't trust a generic instruction book on this fpoint because you would have to know that the instruction book was the book packed with a specific camera. BUT, in any event, the camera's meter takes care of the factor for outdoor pictures and flash is inherently so hard to do at close range (front-to-back fall-off is severe), that guessing at 4x or 10x will do fine.
You can find out what your factor is by switching the
filter in and out and seeing how much YOUR meter changes, and can then use that
with your flash. But you'll have to do it out of doors in sunlight in order to
have enough meter range to make the measurement cleanly.
The newer cameras (Minox C, BL, LX, TLX) have only an ND filter with a factor of
4x.
The Minox lens is covered by a filter. From about 1961 this is a UV filter. Prior to that it was a clear filter, to protect lens and shutter.
The filter set for the Minox A contain a clear UV filter, 10x neutral density filter and a 2x yellow filter.
The Model B filter set consists of a 2x yellow filter, a 3x orange filter and a 1.5x blue filter. The colour filter set consists of a weak skylight filter (R3), a medium skylight filter (R6) and a flash conversion filter (B6). The filter clips are made of black or less common grey plastic.
Filters for the Minox C and Minox BL where offered from 1969. These cover both the lens and the CdS cell with the same filter so that the exposure automatically adjust for the filter factor. A 2x green filter and R3 and R6 skylight filters came in a grey plastic box.
The R3 might be useful on top of Mont Blanc to cut down on the UV even more than the UV filter does. R6 eliminates heavier bluish cast of subjects in the shade or under deep blue sky in noon sunlight. More useful for film in the 1960s than those available in since the 1990s.
The binocular attachment comes in many forms. Some have a tripod bush so that the attachment can be used with a cable release on a tripod (not with the binoculars attached). The clamp or jaws of the attachment are idea to hold filters. This is the only way that filters can be used with the LX/TLX/AX cameras.
The Minox AIII/IIIs, Minox B and early Minox C cameras have a complan lens. The film path of these is curved. This was to correct the chromatic aberration (lens distortion) which was present using 4 elements in a 15mm lens using the glass of the '40s. The negative is sharp from the centre to all the edges.
It was the lack of high index of refraction, low colour
dispersion glass that gave rise to the curve film path solution. Seibert could
have edge to edge sharpness with either a flat plane and poor colour correction
(which didn't matter so much on a Leica negative because the fringing was
smaller compared to the image size), or he could have sharpness and good colour
correction and a curved film surface. By the '70s optical glasses had improved
fantastically so that an equal colour correction could be achieved
with four elements in a similar design (asymmetric triplet, four elements in 3
groups, almost exactly like the Tessar and Elmar of old) but with a flat film
surface.
The Minox lens filled to the later Minox C, BL and some late production B cameras was designed to use a flat film path. It also has a different coating making it better for colour photography than the Complan lens.
The Minox enlargers are also found with Complan and Minox lens. Again the Complan lens has the curved film path. Either enlarger can be used to enlarge images from any of the cameras without any detectable difference. There is a reason to prefer a Complan lens enlarger - the mask is 8x11 where as the later enlargers have a mask that is smaller than the full frame.
The myth that a Complan lens enlarger is required to get the best out of negatives take with a camera fitted with a Complan lens is false.
You can add an 8x11 mask to the Minolta 16 enlarger see http://www.hektor.worldonline.co.uk/minox1/carrier.html
The Minox B meter is a selenium cell galvanometer. It's always "on". It has a mechanism to lock the needle on a reading so you can match the setting with the coupled exposure time selector control. The button serves to 'unlock' the needle to take a reading ... press, aim, release is all it takes to make an exposure reading if the mechanism is in good condition. The needle should swing smoothly and freely as the sensor is aimed at different light levels when the button is pressed, and be locked in position when the button is released.
The B also has two filters built-in, a orange/green or green/neutral density. The meter's reading is adjusted for these filters by resistors in the camera body, actuated when you slide the filters into place, which connect to the meter unit through a pair of contacts evident when you open the camera to expose the film chamber.
Now as to repair ...
If the needle is jumping around erratically when the button is pressed, there is most likely a bad contact in the meter mechanism itself, and/or in the connection to the filter resistor in the body. I have sometimes been able to cure a jumpy needle by cleaning those external contacts with some contact cleaner, a micro-fibre cloth and a small eraser. Other times, the connection problem is internal to the meter unit, which needs dismantling the meter from the camera and opening it up to overhaul.
If the needle just moves and sticks, moves and sticks, then it is also probable that the meter movement needs a cleaning and lubrication. The only way to do this is to dismantle the meter.
If the needle is jumping around erratically even when the button is NOT pressed, it means that not only might there be an electrical problem but that the the mechanism to lock the needle has become loose or sticky. Exercising the button *might* free it up in some circumstances, sometimes a tiny drop of lighter fluid applied to the base of the button might also help, but in most cases again the meter needs to be dismantled so that the mechanical components can be properly cleaned, lubricated and adjusted.
Unless you are familiar with the Minox and have the skills to do this sort of work, I would strongly recommend sending it to a qualified service technician for repair. Just getting the meter out of the casing without damage is a bugger as it is glued in place. A sticky, erratic meter itself does not preclude use of the B, many of whose meters are long dead through deterioration of the selenium cell ... just guesstimate exposure and set it on the shutter speed dial or use a hand-held meter to take a reading. But if the problem is that there is dirt in the mechanism, it signals that the shutter is probably coming up on needing a cleaning soon as well. The youngest B is now, after all, over 30 years old and may have spent many years sitting in a drawer collecting dust. Godfrey DiGiorgi, Submini-L November 2005
The IIIS and B load film at two frames before the 0 point on the counter. You load and wind on twice, then you're ready to shoot. The counter counts up, so if you have a 36 shot roll you shoot until the counter shows 36, then wind on twice more to the red mark and pull the roll.
The later models all wind down to zero, you set the counter at the index mark for the film length you're using, advance two frames to the counter for the length of the roll, shoot until you hit zero, then wind one two frames to the index and pull the roll.
Don't get confused if you switch between Riga/A/B and C/BL cameras. Setting a B at 36 results in the first 14 frames of the roll slightly overlapping or are very closely spaced, then there is some very wide spacing as it passes 50. Godfrey DiGiorgi Submini-L January 1997
The trademark MINOX on the front of my LX showed
a couple of bright flakes where the screened and baked on paint and chipped off.
On Monday I called MPL service, and they said not to touch it because doing
anything would damage the camera finish.
Not being persuaded, I called DAG. Don said that the finish was (supposedly) put
on to stay, being first silk screened and then baked. But, he said, if I had a
plastic burnishing tool or the like and was gentle the paint might come off and
that if the tool wouldn't scratch the metal I could do no damage to the camera.
I don't have a burnisher, but I did have a thumb nail which was a little long
and in need of clipping. I flicked it over the O in MINOX where the flecks had
appeared. Within 3 strokes, the O was gOne. Can't have a trademark saying MIN_X,
of course, so I ran my nail over the rest of the ugly, ugly trademark which
really disfigured the camera (before it started flaking off). Inside of 15 sec I
had black paint under my nail and no paint whatsoever on the camera. A couple of
cleanup strokes with a white plastic pencil eraser followed by some polishing
with my handkerchief and I had a beautiful LX with no trace of the front plate
trademark.
NOTE of warning: the Minox LX/Made in Germany logo on the hatch is put on the
same way and is probably also vulnerable to a burnisher. Note as well that
all TLXs have the Minox logo (while very few LXs did), so you probably don't
want to strip it off the TLX. Peter Zimmerman Submini-L March 1997
1. Take two strips of developed 35 mm film 4
inches or so, the black segments from the roll ends work nice.
2. Using Duco cement (Crazy Glue doesn't work) run a thin bead along the
sprocket holes and glue the two strips together back to back so they spring away
from each other, like a paperback book opened at the middle.
3. When good and dry, lay out the dimensions of the film format, 8 1/2 x 11mm ,
11 x 14 mm etc. somewhere in the middle of the strips with steel rule and cut
out the window with a new x-acto blade. Make one for each subminiature format
you're working with. Its easiest to do this layout and cut out by taping the
strip down to a surface, drafting table in my case, that you don't mind cutting
into.
4. De-burr the window edges with a fingernail or scrape with the x-acto blade.
5. Slide the subminiature negative into the "sleeve" then slide the sleeve
sandwich into the 35mm carrier and enlarge away. The reverse curve of the 35mm
film tends to form a very stiff and flat surface to hold the subminiature
film...When the homemade carrier wilts or cracks apart, make another one.
With these two techniques someone with a basic 35mm darkroom setup can graduate
to subminiature with zero investment in new equipment. If interest grows one can
invest later in the specialized, reels, carriers, etc. to make the work easier.
Carl Turner Submini-L April 1997
![]() Last
updated 26th December 2005
Last
updated 26th December 2005